discover · compare · collections · requirements · contribute · feed · watching · stats · help with your tokens
trinib/AdGuard-WireGuard-Unbound-DNScrypt · source
Snapshot 0 · 2026-11-04T12:47:26Z · YAML · MIT
Content fingerprint
7bae79a49d7ae655c9c8cc419e0a57c36863cfb4b402d71e75acba601252a759GitHub description at capture
Linux ultimate self-hosted network security guide ║ Linux 终极自托管网络安全指南 ║ Guía definitiva de seguridad de red autohospedada de Linux ║ लिनक्स परम स्व-होस्टेड नेटवर्क सुरक्षा गाइड ║ Окончательное руководство по безопасности собственной сети Linux
README at capture
<h2>[4/15/2025] If any issues or questions to be answered, remember to use AI chats now to solve and help.</h2>
<p align="center">
<img src="https://img.shields.io/badge/License-MIT-blue.svg">
<img src="https://badges.frapsoft.com/os/v3/open-source.svg?v=103">
<img src="https://img.shields.io/badge/badges-awesome-green.svg">
<img src="https://img.shields.io/badge/Stay-Safe-red?logo=data:image/svg%2bxml;base64,PHN2ZyBpZD0iTGF5ZXJfMSIgZW5hYmxlLWJhY2tncm91bmQ9Im5ldyAwIDAgNTEwIDUxMCIgaGVpZ2h0PSI1MTIiIHZpZXdCb3g9IjAgMCA1MTAgNTEwIiB3aWR0aD0iNTEyIiB4bWxucz0iaHR0cDovL3d3dy53My5vcmcvMjAwMC9zdmciPjxnPjxnPjxwYXRoIGQ9Im0xNzQuNjEgMzAwYy0yMC41OCAwLTQwLjU2IDYuOTUtNTYuNjkgMTkuNzJsLTExMC4wOSA4NS43OTd2MTA0LjQ4M2g1My41MjlsNzYuNDcxLTY1aDEyNi44MnYtMTQ1eiIgZmlsbD0iI2ZmZGRjZSIvPjwvZz48cGF0aCBkPSJtNTAyLjE3IDI4NC43MmMwIDguOTUtMy42IDE3Ljg5LTEwLjc4IDI0LjQ2bC0xNDguNTYgMTM1LjgyaC03OC4xOHYtODVoNjguMThsMTE0LjM0LTEwMC4yMWMxMi44Mi0xMS4yMyAzMi4wNi0xMC45MiA0NC41LjczIDcgNi41NSAxMC41IDE1LjM4IDEwLjUgMjQuMnoiIGZpbGw9IiNmZmNjYmQiLz48cGF0aCBkPSJtMzMyLjgzIDM0OS42M3YxMC4zN2gtNjguMTh2LTYwaDE4LjU1YzI3LjQxIDAgNDkuNjMgMjIuMjIgNDkuNjMgNDkuNjN6IiBmaWxsPSIjZmZjY2JkIi8+PHBhdGggZD0ibTM5OS44IDc3LjN2OC4wMWMwIDIwLjY1LTguMDQgNDAuMDctMjIuNjQgNTQuNjdsLTExMi41MSAxMTIuNTF2LTIyNi42NmwzLjE4LTMuMTljMTQuNi0xNC42IDM0LjAyLTIyLjY0IDU0LjY3LTIyLjY0IDQyLjYyIDAgNzcuMyAzNC42OCA3Ny4zIDc3LjN6IiBmaWxsPSIjZDAwMDUwIi8+PHBhdGggZD0ibTI2NC42NSAyNS44M3YyMjYuNjZsLTExMi41MS0xMTIuNTFjLTE0LjYtMTQuNi0yMi42NC0zNC4wMi0yMi42NC01NC42N3YtOC4wMWMwLTQyLjYyIDM0LjY4LTc3LjMgNzcuMy03Ny4zIDIwLjY1IDAgNDAuMDYgOC4wNCA1NC42NiAyMi42NHoiIGZpbGw9IiNmZjRhNGEiLz48cGF0aCBkPSJtMjEyLjgzIDM2MC4xMnYzMGg1MS44MnYtMzB6IiBmaWxsPSIjZmZjY2JkIi8+PHBhdGggZD0ibTI2NC42NSAzNjAuMTJ2MzBoMzYuMTRsMzIuMDQtMzB6IiBmaWxsPSIjZmZiZGE5Ii8+PC9nPjwvc3ZnPg==">
</p>
<p align="center">
<img src="https://raw.githubusercontent.com/trinib/AdGuard-WireGuard-Unbound-Cloudflare/main/assets/images/awcu.gif" width= "700">
</p>
<p align="center">
<a href="https://img.shields.io/github/stars/trinib/AdGuard-WireGuard-Unbound-Cloudflare?color=FFD700&style=for-the-badge" alt="GitHub Repo stars">
<img src="https://img.shields.io/github/stars/trinib/AdGuard-WireGuard-Unbound-Cloudflare?color=FFD700&style=for-the-badge"></a>
<a href="https://img.shields.io/github/forks/trinib/AdGuard-WireGuard-Unbound-Cloudflare?color=00a671&style=for-the-badge" alt="GitHub forks">
<img src="https://img.shields.io/github/forks/trinib/AdGuard-WireGuard-Unbound-Cloudflare?color=00a671&style=for-the-badge"></a>
<a href="https://img.shields.io/github/watchers/trinib/AdGuard-WireGuard-Unbound-Cloudflare?color=9700b2&style=for-the-badge" alt="GitHub watchers">
<img src="https://img.shields.io/github/watchers/trinib/AdGuard-WireGuard-Unbound-Cloudflare?color=9700b2&style=for-the-badge"></a>
</p>
<div align="center">
Translate Site | Traducir sitio | 翻译网站 | Traduire le site | Перевести сайт | अनुवाद साइट
<br><a href="https://chrome.google.com/webstore/detail/google-translate/aapbdbdomjkkjkaonfhkkikfgjllcleb?hl=en"><img src="https://www.vectorlogo.zone/logos/google_chrome/google_chrome-icon.svg" width=20px height=20px></a> <a href="https://addons.mozilla.org/en-US/firefox/addon/traduzir-paginas-web/"><img src="https://www.vectorlogo.zone/logos/firefox/firefox-icon.svg" width=20px height=20px></a> <a href="https://addons.opera.com/en/extensions/details/translator/"><img src="https://www.vectorlogo.zone/logos/opera/opera-icon.svg" width=20px height=20px></a></div>
<h1 align="center">Softwares</h1>
<div align="center">
_<a href="https://adguard.com/en/adguard-home/overview.html"><b>AdGuard Home</b></a> or <a href="https://pi-hole.net/"><b>Pi-hole</b></a>_</br>Block banners, pop-ups and video advertisements network-wide
_<a href="https://www.wireguard.com/"><b>WireGuard</b></a> or <a href="https://openvpn.net/"><b>OpenVPN</b></a>_</br>A VPN server accessible from public networks (IPv4 & IPv6)
_<a href="https://www.nlnetlabs.nl/projects/unbound/about/"><b>Unbound</b></a> or <a href="https://www.knot-resolver.cz/"><b>Knot</b></a>_</br>A validating, recursive, caching DNS resolvers (DoT)
_<a href="https://dnsprivacy.org/dns_privacy_daemon_-_stubby/about_stubby/"><b>Stubby</b></a>_</br>DNS queries are sent to resolvers over an encrypted TLS connection providing increased privacy
_<a href="https://github.com/cloudflare/cloudflared"><b>Cloudflared Tunnel</b></a>_</br>A tunneling daemon that proxies traffic from a DNS network to your origins(DoH)
_<a href="https://dnscrypt.info/"><b>DNScrypt</b></a>_</br>Modern encrypted DNS protocols such as DNSCrypt v2, DNS-over-HTTPS, Anonymized DNSCrypt and oDoH (Oblivious DoH)
#
</div>
<p align="right">
<i>All software are free, open-source and self-hosted </i></br><a href="https://github.com/trinib/Adguard-Wireguard-Unbound-Cloudflare/wiki/About"><b>ABOUT</b></a> | <a href="https://github.com/trinib/AdGuard-WireGuard-Unbound-Cloudflare/discussions/17"><b>FAQ</b></a> | <a href="https://github.com/trinib/AdGuard-WireGuard-Unbound-Cloudflare/wiki"><b>WIKI</b></a> | <a href="https://github.com/trinib/AdGuard-WireGuard-Unbound-Cloudflare/discussions"><b>DISCUSS</b></a>
<h3 align="left">DNS query time<img src="https://raw.githubusercontent.com/Tarikul-Islam-Anik/Telegram-Animated-Emojis/main/Objects/Hourglass%20Done.webp" alt="Hourglass Done" width="25" height="25" /></h3>
Query speed results(Ethernet LAN) using <a href="https://github.com/trinib/AdGuard-WireGuard-Unbound-DNScrypt/wiki/Install-Dig-&-WSL">BIND9 dig</a> tool:
- AdGuard default DNS resolvers - `60-70 msec`
- Public Cloudflare/Quad9/Google DNS Resolvers - `50-70 msec`
- Self-hosted setup - `5-10 msec`
> [!NOTE]
> Originally `0 msec` or same as ISP DNS speed but multiple blocklist with _excessive_ URLs slow down low-end devices affecting DNS query. This result was from a 1GB | 1.4GH ARM architecture. Blocklists used <a href="https://github.com/trinib/AdGuard-WireGuard-Unbound-DNScrypt/blob/beb05c3a4b74a675dc88c43bcea41b08d00a04f3/bulkurls.py#L20"><b>🔗click here🔗</b></a>.
<details><summary>Preview<img src="https://raw.githubusercontent.com/Tarikul-Islam-Anik/Telegram-Animated-Emojis/main/Objects/Clapper%20Board.webp" alt="Clapper Board" width="25" height="25" /></summary>
<p>
AdGuard default <b><i>vs</i></b> Self-hosted:
https://user-images.githubusercontent.com/18756975/150230438-b767e86f-4e18-4791-b5fe-0813615a37a3.mp4
Public Cloudflare/Quad9/Google:</br>
<i>(same results if addresses are added manually in the system's network DNS option fields)</i>
https://user-images.githubusercontent.com/18756975/150319049-3d8acdc9-624f-4b60-8ee2-b80227522252.mp4
</p>
</details>
#
# Table of contents
- [Requirements](#requirements)
- [Install Raspberry Pi OS](#install-raspberry-pi-os-) <img src="https://www.vectorlogo.zone/logos/raspberrypi/raspberrypi-icon.svg" width=20px height=20px>
- [Access Pi OS with SSH](#access-pi-os-with-ssh)
- [Install AdGuard Home](#install-adguard-home-) <img src="https://www.vectorlogo.zone/logos/adguard/adguard-icon.svg" width=20px height=20px>
- [Setup devices to work with Adguard](#setup-devices-to-work-with-adguard)
- [Updating Adguard](#updating-adguard)
- [Setting up AdGuard blocklist](#setting-up-adguard-blocklist)
- [Add/Remove multiple URLs](#addremove-multiple-urls)
- [Uninstall AdGuard](#uninstall-adguard)
- [Install SSL certificate](#install-ssl-certificate)<img src="https://www.vectorlogo.zone/logos/letsencrypt/letsencrypt-icon.svg" width=20px height=20px><img src="https://avatars.githubusercontent.com/u/27781978?s=280&v=4" width=20px height=20px>
- [Install Pi-hole](#install-pi-hole-as-an-alternativeclick-here) <img src="https://upload.wikimedia.org/wikipedia/en/1/15/Pi-hole_vector_logo.svg" width=21px height=21px>
- [Install Unbound](#install-unbound-) <img src="https://www.vectorlogo.zone/logos/nlnetlabsnl_unbound/nlnetlabsnl_unbound-icon.svg" width=20px height=20px>
- [Install Knot](#install-knot-resolver-as-an-alternativeclick-here) <img src="https://www.vectorlogo.zone/logos/knot-resolvercz/knot-resolvercz-icon.svg" width=20px height=20px>
- [Setup DNS security](#setup-dns-security-)
- [Configure DoH/oDoH](#configure-dohodoh)
- [Cloudflared tunnel](#cloudflared-tunnelclick-here) <img src="https://www.vectorlogo.zone/logos/cloudflare/cloudflare-icon.svg" width=20px height=20px>
- [DNScrypt proxy](#dnscrypt-proxyclick-here) <img src="https://i.imgur.com/lEHVsn3.png" width=20px height=20px>
- [Configure DoT on Unbound](#configure-dot-on-unbound)
- [Configure Stubby and Unbound](#configure-stubby-and-unbound) <img src="https://getdnsapi.net/static/logo.svg" width=50px height=20px>
- [Configure AdGuard with (DoH/DoT/oDoH)](#configure-adguard-with-dohdotodoh)
- [Monitor query logs](#use-tail-command-to-monitor-logs-in-realtime)
- [Install WireGuard](#install-wireguard-) <img src="https://www.vectorlogo.zone/logos/wireguard/wireguard-icon.svg" width=20px height=20px>
- [Connecting VPN to Android/iOS Phone](#connecting-vpn-to-androidios-phone)
- [Connecting VPN to Windows](#connecting-vpn-to-windows)
- [Configure WireGuard with adblocking & DNS security](#configure-wireguard-with-adblocking--dns-security)
- [Install OpenVPN](#install-openvpn-as-an-alternativeclick-here)</a> <img src="https://i.imgur.com/Agstbe5.png" width=20px height=20px>
- [Limit traffic](#limit-traffic)
- [Disable all IPv6](#disable-all-ipv6)
- [Test Vpn](#test-vpn) <img src="https://i.imgur.com/6Yf8Zra.png" width=20px height=20px>
- [Extras](#extras)
- [Repository Resources](#repository-resources)
#
# Requirements
This tutorial is installed on a Raspberry Pi with Debian OS. Other Linux <a href="https://distrowatch.com/dwres.php?resource=popularity">operating system</a><i>(𝟹𝟸/𝟼𝟺bit)</i>, <a href="https://en.wikipedia.org/wiki/Category:Single-board_computers">hardware</a> or <a href="https://github.com/dalisoft/awesome-hosting#vps">VPS service</a> can be used.</br>_(Raspberry Pi OS is most simple and recommended for Pi. For more experience users, <a href="https://dietpi.com/">DietPi</a> OS is also recommended)_
- A Raspberry Pi 3 or 4 version
- A router that supports port forwarding(most can)
- MicroSD USB card reader
- MicroSD card (8GB or bigger, at least Class 4)
- Ethernet cable
- (Optional if using monitor) MicroHDMI-(RPi 4) or HDMI-(RPi 3)
#
<h1 align="center"><b><i>Install Raspberry Pi OS</b></i> </h1>
Raspberry Pi OS comes in desktop and lite versions(use lite for <a href="https://www.google.com/search?q=What+is+a+headless+operating+system%3F&client=firefox-b-d&sxsrf=APq-WBvlqMZasn_klYxS5HZmhKQlduKYuQ%3A1650123816301&ei=KORaYtz7EYOdwbkP74G16AE&ved=0ahUKEwjcr5-f9pj3AhWDTjABHe9ADR0Q4dUDCA0&uact=5&oq=What+is+a+headless+operating+system%3F&gs_lcp=Cgdnd3Mtd2l6EAMyCAghEBYQHRAeOgcIABBHELADSgQIQRgASgQIRhgAUMEBWMEBYNAEaAFwAXgAgAFqiAFqkgEDMC4xmAEAoAECoAEByAEIwAEB&sclient=gws-wiz">headless</a> mode). It can be accessed with a monitor/keyboard/mouse or connect via <a href="https://www.google.com/search?q=What+is+SSH+in+Linux%3F&client=firefox-b-d&sxsrf=APq-WBsiHvek7g0OrBHWDbEy-x7m-B6O3Q%3A1650481751310&ei=V1pgYoHNEs-uwbkPtI25mAI&ved=0ahUKEwjB1PrTq6P3AhVPVzABHbRGDiMQ4dUDCA0&uact=5&oq=What+is+SSH+in+Linux%3F&gs_lcp=Cgdnd3Mtd2l6EAMyBggAEBYQHjIGCAAQFhAeMgYIABAWEB4yBggAEBYQHjIGCAAQFhAeMgYIABAWEB4yBggAEBYQHjIGCAAQFhAeMgYIABAWEB4yBggAEBYQHjoHCCMQsAMQJzoHCAAQRxCwAzoHCAAQsAMQQzoKCAAQ5AIQsAMYAToPCC4Q1AIQyAMQsAMQQxgCSgQIQRgASgQIRhgBUM8IWM8IYJAMaAFwAXgAgAFxiAFxkgEDMC4xmAEAoAECoAEByAERwAEB2gEGCAEQARgJ2gEGCAIQARgI&sclient=gws-wiz">ssh</a> from a terminal.<br>Raspberry Pi OS <b>cannot</b> be setup through the <a href="https://www.raspberrypi.com/news/raspberry-pi-bullseye-update-april-2022/#Headless%20setup">wizard</a> anymore, the <a href="https://www.raspberrypi.com/news/raspberry-pi-imager-imaging-utility/">Imager</a> utility is needed to preconfigure an image user account.
* Install Raspberry Pi Imager: https://www.raspberrypi.com/software/
- Open Pi Imager tool and choose OS, go to advanced settings and configure user details. Then choose storage and write.
<p align="center">
<img src="https://i.imgur.com/S6pDPZv.png"></p>
<i>Place SD card into the Raspberry Pi, plug in Ethernet cable and boot up</i>
## Access Pi OS with SSH
* Wait for a minute for Pi's first boot up
* Open browser and login router's admin panel(default <a href="https://www.google.com/search?q=what+is+gateway+ip+address&client=firefox-b-d&biw=1440&bih=660&sxsrf=ALiCzsaDFykPI5rNea5FvSd5YDwm5cJNUg%3A1667340103798&ei=R5dhY-quMJaGwbkPt5is6Ao&oq=what+is+my+gateway+address&gs_lcp=Cgxnd3Mtd2l6LXNlcnAQARgAMgoIABBHENYEELADMgoIABBHENYEELADMgoIABBHENYEELADMgoIABBHENYEELADMgoIABBHENYEELADMgoIABBHENYEELADMgoIABBHENYEELADMgoIABBHENYEELADMgcIABCwAxBDMgcIABCwAxBDSgQIQRgASgQIRhgAUABYAGCaFWgBcAF4AIABAIgBAJIBAJgBAMgBCsABAQ&sclient=gws-wiz-serp">IP gateway address</a>)
* Find list of all devices connected to network and copy the IP address of the Raspberry Pi. It will most likely have the hostname `raspberrypi`
* Open terminal on host machine <i>(Windows PowerShell or RaspController for <a href="https://play.google.com/store/apps/details?id=it.Ettore.raspcontroller&hl=en&gl=US">Android</a>&<a href="https://apps.apple.com/us/app/raspcontroller/id1584315865">iOS</a>)</i>.
Type the following command:
```
ssh pi@pi's IP address
```
<i>Use right mouse button to paste text in Windows PowerShell</i>.
Type “yes” for fingerprint question, and enter password.
<p align="center">
<img src="https://i.imgur.com/Wf30jxG.jpg"></p>
Run in terminal:
```bash
sudo apt update -y && sudo apt upgrade -y
```
*_Reboot when finished_*
```bash
sudo reboot
```
**[<img src="https://raw.githubusercontent.com/Tarikul-Islam-Anik/Telegram-Animated-Emojis/main/Symbols/Up%20Button.webp" alt="Up Button" width="25" height="25" /> Return to contents <img src="https://raw.githubusercontent.com/Tarikul-Islam-Anik/Telegram-Animated-Emojis/main/Symbols/Up%20Button.webp" alt="Up Button" width="25" height="25" />](#table-of-contents)**
#
<h1 align="center"><b><i>Install AdGuard Home</b></i> </h1>
Installation scripts are from <a href="https://github.com/AdguardTeam/AdGuardHome">AdGuard Home</a> main project. Follow to keep updated.<br>
Run one of the following command in terminal:
Stable:
```bash
curl -s -S -L https://raw.githubusercontent.com/AdguardTeam/AdGuardHome/master/scripts/install.sh | sh -s -- -v
```
Beta - testing version of AdGuard Home. More or less stable versions:
```bash
curl -s -S -L https://raw.githubusercontent.com/AdguardTeam/AdGuardHome/master/scripts/install.sh | sh -s -- -c beta
```
Edge - newest version of AdGuard Home. New updates are pushed to this channel daily and might not be stable:
```bash
curl -s -S -L https://raw.githubusercontent.com/AdguardTeam/AdGuardHome/master/scripts/install.sh | sh -s -- -c edge
```
* When installation is finished, it will show the `links` to your AdGuard home page(Get Started) in terminal
* Choose `Eth0` in **Listen Interfaces** option
<p align="center">
<img src="https://i.imgur.com/5W70PLb.png" width=580px height=650px></p>
* Set up username&password and then login admin panel
> [!TIP]
> In general settings, can set "Query logs retention" to `24 hours`. (on forums some users state logs fill up which slows down Pi and needing a reboot, if using powerful device, no need to change settings)
## Setup devices to work with AdGuard
- For Android/Apple, go to WiFi advanced settings and select static option. In `DNS 1` field enter "Pi's IP" address
<p align="center">
<img src="https://i.imgur.com/nxpiqDw.jpg" width=450px height=580px></p>
- For PC/Windows
- <i>IPv4</i>
Go to network settings / change adapter options, right click in properties and select "Internet Protocol Version 4(TCP/IPv4)". Enter Pi's IP address in `Preferred DNS` server.
- <i>IPv6 (needed for `DoH`/`DoT`/`oDoH` to detect if using it)</i>
Go to "Internet Protocol Version 6(TCP/IPv6)" Enter <a href="https://www.google.com/search?q=what+is+%3A%3A1&client=firefox-b-d&sxsrf=ALiCzsYu-GId0NA6gwu0SgOIpe6KTsOmAw%3A1667330913170&ei=YXNhY-yLCtWdwbkP-4u4iAY&ved=0ahUKEwiswLXW2437AhXVTjABHfsFDmEQ4dUDCA4&uact=5&oq=what+is+%3A%3A1&gs_lcp=Cgxnd3Mtd2l6LXNlcnAQAzIECCMQJzIECCMQJzIECCMQJzIFCAAQkQIyBQgAEJECMgUIABCRAjIFCAAQkQIyCAgAELEDEIMBMggIABCxAxCDATIFCAAQgARKBAhBGABKBAhGGABQsgJY2BpgnhtoAXAAeACAAfACiAGTBZIBBTItMS4xmAEAoAEBwAEB&sclient=gws-wiz-serp">`::1`</a>
<p align="center">
<img src="https://i.imgur.com/8gsDk3z.jpg"></p>
## Updating AdGuard
AdGuard Home can be updated from its user interface or <a href="https://github.com/AdguardTeam/AdGuardHome/wiki/FAQ#how-to-update-adguard-home-manually">manually</a> from command line.<br>
_Use script constructed with manual commands and can be set to autorun<a href="https://github.com/trinib/AdGuard-WireGuard-Unbound-Cloudflare/wiki/AdGuard-Home-update-script"><b>🔗click here🔗</b></a>_.
## Setting up AdGuard blocklist
In AdGuard homepage under filters, select DNS blocklist section for adding URLs.
<p align="center">
<img src="https://i.imgur.com/xAlbKPW.png"></p>
<p align="center">
<br>
<a href="https://github.com/T145/black-mirror"><img src="https://raw.githubusercontent.com/T145/black-mirror/master/.github/images/logo.png" width=220px height=60px></a>
<br>
Aiming to promote security, safety, and sanity across the internet! </p>
<img src="https://raw.githubusercontent.com/Tarikul-Islam-Anik/Animated-Fluent-Emojis/master/Emojis/Hand%20gestures/Oncoming%20Fist.png" alt="Oncoming Fist" width="25" height="25" />BIG THANKS<img src="https://raw.githubusercontent.com/Tarikul-Islam-Anik/Animated-Fluent-Emojis/master/Emojis/Hand%20gestures/Oncoming%20Fist.png" alt="Oncoming Fist" width="25" height="25" /> to <a href="https://github.com/T145">T145</a><br>
Large list of Blocklists and Allowlists Sources<a href="https://github.com/T145/black-mirror/blob/master/dist/SOURCES.md"><b>🔗click here🔗</b></a>
<b>
</b>
> [!CAUTION]
> Some Blocklists can block important web content. To unblock, go to "Query Log" section, hover cursor over that specific query<i>(look for client IP & time)</i> to show _unblock_ option. The links is automatically created in "Custom filtering rules" example: `@@||bitly.com^$important`(can add the websites manually as well).
## Add/Remove multiple URLs
Only one URL can be added at a time in DNS blocklist with AdGuard for now, but a python script can be used to add multiple URLs at once.<br>
Create a new python file(bulkurls.py):
```bash
nano bulkurls.py
```
Then copy and paste script text<a href="https://raw.githubusercontent.com/trinib/Adguard-Wireguard-Unbound-Cloudflare/main/bulkurls.py"><b>🔗click here🔗</b></a>. Set `your AdGuard credentials` and save (control+x then y then enter).
> [!NOTE]
> If using **DietPi** install `sudo apt-get install python3-pip -y && pip install requests` for it is not currently installed by default.
To run : `sudo python3 bulkurls.py`<br>
_(Reboot when finished)_
To **remove** change `add` in <a href="https://github.com/trinib/AdGuard-WireGuard-Unbound-Cloudflare/blob/62ba01ed8ed3a5bc5294b9fe7ee38c3e83ae1b86/bulkurls.py#L150">second of last line</a> to `remove` in bulkurls.py file.<br>
Or just change it from command line in terminal:
```bash
sed -i 's/add_url/remove_url/g' bulkurls.py
# Revert
sed -i 's/remove_url/add_url/g' bulkurls.py
```
## Uninstall AdGuard
Run this <a href="https://github.com/trinib/AdGuard-WireGuard-Unbound-Cloudflare/blob/main/assets/scripts/remove_adguard.sh">script</a> from repo through network using <a href="https://www.google.com/search?q=What+does+cURL+actually+do%3F&client=firefox-b-d&sxsrf=ALiCzsbIVTaRzlDt3jC6H5lirpsy2S0LoA%3A1654699803869&ei=G7egYprXNNbawbkP38uIqAE&ved=0ahUKEwja0JOQjZ74AhVWbTABHd8lAhUQ4dUDCA0&uact=5&oq=What+does+cURL+actually+do%3F&gs_lcp=Cgdnd3Mtd2l6EAMyBQghEKABMgUIIRCgATIFCCEQoAEyBQghEKABMggIIRAeEBYQHTIICCEQHhAWEB0yCAghEB4QFhAdMggIIRAeEBYQHTIICCEQHhAWEB0yCAghEB4QFhAdOgcIIxCwAxAnOgcIABBHELADSgQIQRgASgQIRhgAUI8DWI8DYNgGaAFwAXgAgAGcAYgBnAGSAQMwLjGYAQCgAQKgAQHIAQnAAQE&sclient=gws-wiz">curl</a> in terminal:
```bash
curl -s -L https://raw.githubusercontent.com/trinib/AdGuard-WireGuard-Unbound-Cloudflare/main/assets/scripts/remove_adguard.sh | sh
```
## Install SSL certificate
If using AdGuard Home on a `VPS(Virtual private server)`, get a <a href="https://www.google.com/search?q=What+is+purpose+of+SSL+certificate%3F&client=firefox-b-d&sxsrf=APq-WBsi9wVR8QaPcOuMXEpKVMqtOxrI-A%3A1650799271342&ei=pzJlYvDEFJbUkPIP48mPkAY&ved=0ahUKEwiwtKfByqz3AhUWKkQIHePkA2IQ4dUDCA0&uact=5&oq=What+is+purpose+of+SSL+certificate%3F&gs_lcp=Cgdnd3Mtd2l6EAMyBggAEBYQHjIGCAAQFhAeOgcIABBHELADOgcIABCwAxBDOgoIABDkAhCwAxgBOhUILhDHARCvARDUAhDIAxCwAxBDGAI6EgguEMcBENEDEMgDELADEEMYAkoECEEYAEoECEYYAVC7AVi7AWDnBGgBcAF4AIABbYgBbZIBAzAuMZgBAKABAqABAcgBE8ABAdoBBggBEAEYCdoBBggCEAEYCA&sclient=gws-wiz">SSL certificate</a> to make connection secure and data safe<a href="https://github.com/trinib/AdGuard-WireGuard-Unbound-Cloudflare/wiki/Create-auto-renewal-SSL-certificate"><b>🔗click here🔗</b></a>. In this case your DNS resolver(AdGuard Home) resides outside your network, and your DNS requests have better protection from the third parties.
### _Install Pi-hole as an alternative<a href="https://github.com/pi-hole/pi-hole/#one-step-automated-install"><b>🔗click here🔗</b></a>_
**[<img src="https://raw.githubusercontent.com/Tarikul-Islam-Anik/Telegram-Animated-Emojis/main/Symbols/Up%20Button.webp" alt="Up Button" width="25" height="25" /> Return to contents <img src="https://raw.githubusercontent.com/Tarikul-Islam-Anik/Telegram-Animated-Emojis/main/Symbols/Up%20Button.webp" alt="Up Button" width="25" height="25" />](#table-of-contents)**
#
<h1 align="center"><b><i>Install Unbound</b></i> </h1>
> [!TIP]
> Before installing other DNS resolvers, it is a good idea to turn off <a href="https://www.freedesktop.org/software/systemd/man/systemd-resolved.service.html">systemd-resolved</a> DNSStubListener(<a href="https://github.com/trinib/AdGuard-WireGuard-Unbound-Cloudflare/issues/27">issue#27</a>).
`OPTIONAL:` Installing via the package manager is the easiest option with automatic updates and stable versions. The downside is that it can be outdated for some distributions or not have all the compile-time options included that you want.<br>**Building and compiling** Unbound yourself ensures that you have the latest version and all the compile-time options you desire<a href="https://github.com/trinib/AdGuard-WireGuard-Unbound-Cloudflare/wiki/Build-Unbound-from-source"><b>🔗click here🔗</b></a>.
For the version from package manager, run the following command in terminal:
```bash
sudo apt install unbound -y
```
> [!IMPORTANT]
> If using **DietPi** or other OS that do not auto insert `nameserver 127.0.0.1` in resolv.conf(to check - `sudo nano /etc/resolv.conf`) and want to query cache on <a href="https://www.google.com/search?q=localhost+in+linux+meaning&client=firefox-b-d&biw=1440&bih=660&sxsrf=ALiCzsZQjrruvwGr5xLnu1DMlt8k1FU1jQ%3A1667331220024&ei=lHRhY_iPAZydwbkP6sWwwAw&oq=localhost+in+linux+mea&gs_lcp=Cgxnd3Mtd2l6LXNlcnAQARgAMgYIABAWEB4yBQgAEIYDMgUIABCGAzIFCAAQhgM6CggAEEcQ1gQQsAM6BQgAEIAEOgUIIRCgAToICCEQFhAeEB1KBAhBGABKBAhGGABQjThY_D9g7UhoAnABeACAAdoBiAHyBJIBBTAuMy4xmAEAoAEByAEIwAEB&sclient=gws-wiz-serp">local</a> hosts, just install resolvconf package and restart unbound-resolvconf.service which should be automatically set:
>
> sudo apt-get install resolvconf -y && sudo systemctl restart unbound-resolvconf.service
> Run `ping -c 3 google.com` to confirm localhost is reachable to internet. If not, set/add your default network's dns/gateway or whatever was the default<a href="https://github.com/trinib/AdGuard-WireGuard-Unbound-DNScrypt/wiki/Set-permanent-DNS-nameservers"><b>🔗click here🔗</b></a>
Confirm 127.0.0.1 address interface is up:
```bash
## Install dig: sudo apt install dnsutils
dig google.com @127.0.0.1
```
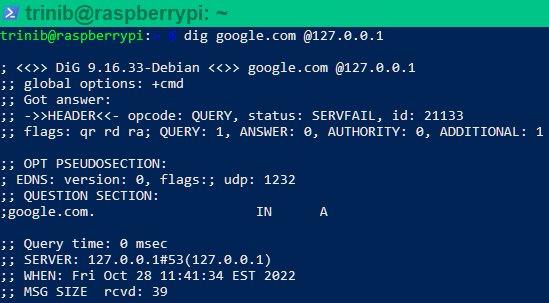
* For recursively querying a host that is not cached as an address, the resolver needs to start at the top of the server tree and query the root servers, to know where to go for the top level domain for the address being queried. Unbound comes with default built-in hints.<br>Download latest:
```bash
wget -O root.hints https://www.internic.net/domain/named.root && sudo mv root.hints /var/lib/unbound/
```
* This needs to update every 6 months using <a href="https://www.google.com/search?q=How+does+cron+job+work%3F&client=firefox-b-d&sxsrf=ALiCzsbaAmCCZqLJt2cOtQ3UXn7wxrWD3Q%3A1651353477111&ei=hadtYt-vBoavqtsP_fGX4Ak&ved=0ahUKEwifhpuL27z3AhWGl2oFHf34BZwQ4dUDCA0&uact=5&oq=How+does+cron+job+work%3F&gs_lcp=Cgdnd3Mtd2l6EAMyBggAEBYQHjoHCAAQRxCwAzoHCAAQsAMQQ0oECEEYAEoECEYYAFDTAVjTAWDRBmgBcAF4AIABfYgBfZIBAzAuMZgBAKABAqABAcgBCcABAQ&sclient=gws-wiz">cron job</a>. Enter in command line `crontab -e`, it will ask select an editor(choose 1), paste these lines at the bottom of crontab and save (control+x then y then enter):
> 1 0 1 */6 * wget -O root.hints https://www.internic.net/domain/named.root<br>
> 2 0 1 */6 * sudo mv root.hints /var/lib/unbound/
<p align="center">
<img src="https://i.imgur.com/26ro62t.jpg"></p>
Skip straight ahead to configuring DoT in this [**section**](#configure-dot-on-unbound), and setup with AdGuard in this [**section**](#configure-adguard-with-dohdotodoh) if not interested in Stubby or Cloudflared or DNScrypt proxy below.
### _Install Knot Resolver as an alternative<a href="https://github.com/trinib/AdGuard-WireGuard-Unbound-Cloudflare/wiki/Install-Knot-Resolver"><b>🔗click here🔗</b></a>_
**[<img src="https://raw.githubusercontent.com/Tarikul-Islam-Anik/Telegram-Animated-Emojis/main/Symbols/Up%20Button.webp" alt="Up Button" width="25" height="25" /> Return to contents <img src="https://raw.githubusercontent.com/Tarikul-Islam-Anik/Telegram-Animated-Emojis/main/Symbols/Up%20Button.webp" alt="Up Button" width="25" height="25" />](#table-of-contents)**
#
<h1 align="center"><b><i>Setup DNS Security</b></i> </h1>
## Configure DoH/oDoH
<i>Option 1 (Simple)</i><h4>Cloudflared Tunnel<a href="https://github.com/trinib/AdGuard-WireGuard-Unbound-Cloudflare/wiki/Install-Cloudflared-Tunnel-(DoH)"><b>🔗click here🔗</b></a>:</h4>- DNS over HTTPS only<br><br>
<i>Option 2 (Advanced) - no need for cloudflare tunnel or stubby methods</i><h4>DNScrypt proxy<a href="https://github.com/trinib/AdGuard-WireGuard-Unbound-Cloudflare/wiki/Install-DNScrypt-proxy-(DoH)(oDoH)(Anonymized-DNS)"><b>🔗click here🔗</b></a>:</h4>- DNS over HTTPS
<details><summary><b>Oblivious DNS Over HTTPS</b></summary>
<p>
_<a href="https://blog.cloudflare.com/oblivious-dns/">Oblivious DNS Over HTTPS</a></h4>(oDoH) is a newly proposed open-source DNS standard built by engineers from Cloudflare, Apple, and Fastly which is supposed to increase the privacy of already existing DNS Over HTTPS_.<br>
</p>
</details>
<details><summary><b>Anonymized-DNS</b></summary>
<p>
_<a href="https://github.com/DNSCrypt/dnscrypt-proxy/wiki/Anonymized-DNS">Anonymized DNS</a> is a lightweight alternative to Tor and SOCKS proxies, dedicated to DNS traffic. They hide the client IP address to DNS resolvers, providing anonymity in addition to confidentiality and integrity._.
</p>
</details>
## Configure DoT on Unbound
Download unbound <a href="https://github.com/trinib/AdGuard-WireGuard-Unbound-Cloudflare/blob/main/unbound.conf">configuration</a> file with DNS over TLS settings and move it to unbound folder.<br>
Enter in terminal:
```bash
wget https://raw.githubusercontent.com/trinib/AdGuard-WireGuard-Unbound-Cloudflare/main/unbound.conf && sudo mv unbound.conf /etc/unbound/unbound.conf.d/
```
- Choose DNS provider<a href="https://github.com/trinib/AdGuard-WireGuard-Unbound-Cloudflare/wiki/DNS-Providers#unbound"><b>🔗click here🔗</b></a>
Restart unbound service and check status:
```bash
sudo systemctl restart unbound && sudo systemctl status unbound
```
<p align="center">
<img src="https://i.imgur.com/Ul32WLD.png" width=700 height=220></p>
Run `dig google.com @127.0.0.1` and check for `NOERROR` status to confirm its connected to DNS server.

## Configure Stubby and Unbound
Use Unbound for caching and Stubby as a <a href="https://www.google.com/search?q=How+does+TLS+proxy+work%3F&client=firefox-b-d&sxsrf=ALiCzsaNlPunZpYtzDVoVA6PVTkY6rOqyQ%3A1651275938995&ei=onhsYsqtPImRggez_K2oBA&ved=0ahUKEwjKhpSeurr3AhWJiOAKHTN-C0UQ4dUDCA4&uact=5&oq=How+does+TLS+proxy+work%3F&gs_lcp=Cgdnd3Mtd2l6EAMyBQghEKABMgUIIRCgATIFCCEQoAEyBQghEKABMggIIRAWEB0QHjIICCEQFhAdEB4yCAghEBYQHRAeMggIIRAWEB0QHjIICCEQFhAdEB4yCAghEBYQHRAeOgcIABBHELADSgQIQRgASgQIRhgAUMUBWMUBYMkHaAFwAXgAgAGfAYgBnwGSAQMwLjGYAQCgAQKgAQHIAQjAAQE&sclient=gws-wiz">TLS forwarder</a>
> [!WARNING]
> Stubby and DNScrypt **should not** be used together when both are set to run as a forwarder in Unbound, else redundant caching will occur. Use with Cloudflare tunnel only.
`OPTIONAL:` **Building and compiling** Stubby yourself ensures that you have the latest version<a href="https://github.com/trinib/AdGuard-WireGuard-Unbound-Cloudflare/wiki/Build-Stubby-from-source"><b>🔗click here🔗</b></a>.
Install the version from package manager:
```bash
sudo apt install stubby -y
```
- Download stubby <a href="https://github.com/trinib/AdGuard-WireGuard-Unbound-Cloudflare/blob/main/stubby.yml">configuration</a> file and replace with default one in stubby folder:
```bash
wget https://raw.githubusercontent.com/trinib/AdGuard-WireGuard-Unbound-Cloudflare/main/stubby.yml && sudo mv stubby.yml /etc/stubby/
```
- Forward Stubby address in Unbound upstreams. Open `sudo nano /etc/unbound/unbound.conf.d/`<a href="https://github.com/trinib/AdGuard-WireGuard-Unbound-Cloudflare/blob/main/unbound.conf">`unbound.conf`</a> and uncomment Stubby addresses(remove # infront of lines [169](https://github.com/trinib/AdGuard-WireGuard-Unbound-Cloudflare/blob/68726b2c1e24d1940ac82775be9aa76748f564d2/unbound.conf#L169)&[170](https://github.com/trinib/AdGuard-WireGuard-Unbound-Cloudflare/blob/68726b2c1e24d1940ac82775be9aa76748f564d2/unbound.conf#L170))<br>Or do it from command line:
```bash
awk '{sub(/[#]forward-addr: 127.0.0.1@8053/,"forward-addr: 127.0.0.1@8053") || sub(/[#]forward-addr: ::1@8053/,"forward-addr: ::1@8053")}1' /etc/unbound/unbound.conf.d/unbound.conf > unbound.conf && sudo mv unbound.conf /etc/unbound/unbound.conf.d/
```
- Choose DNS provider<a href="https://github.com/trinib/AdGuard-WireGuard-Unbound-Cloudflare/wiki/DNS-Providers#stubby"><b>🔗click here🔗</b></a>
Restart stubby service and check status:
```bash
sudo systemctl restart stubby && sudo systemctl status stubby
```
<p align="center">
<img src="https://i.imgur.com/PCxwdDC.png" width=700 height=240></p>
## Configure AdGuard with `(DoH/DoT/oDoH)`
* In AdGuard homepage under settings, select **DNS settings**
* Delete everything from both _**Upstream**_ and _**Bootstrap DNS**_ server options and add the following for:
- DNS over TLS(unbound/knot) : `127.0.0.1:53`
- DNS over HTTPS/Oblivious DNS over HTTPS :
- `127.0.0.1:5053`(cloudflared tunnel)
- `127.0.0.1:5353`(dnscrypt proxy)
- TLS forwarder(stubby) : `127.0.0.1:8053`
- Select <a href="https://adguard.com/en/blog/in-depth-review-adguard-home.html#dns">Parallel Request</a> option for DNS resolvers to work simultaneously.
<p align="center">
<img src="https://i.imgur.com/iQRdMax.png" width=650px height=320px></p>
- In DNS setting look for DNS cache configuration section and set cache size to `0` (caching is already handled by Unbound) and save.
<p align="center">
<img src="https://i.imgur.com/TdzhNUo.png" width=650px height=350px></p>
<p align="center">
Click apply and test upstreams</p>
#### Now go to https://1.1.1.1/help in browser and these options should output 'Yes'.
> [!NOTE]
> only detects for cloudflare servers in the first 3 info lines
- [x] Connected to 1.1.1.1
- [x] DNS over HTTPS(DoH)
- [x] DNS over TLS(DoT)
- [ ] DNS over WARP
<p align="center">
<img src="https://i.imgur.com/ootfGYq.jpg" width=650px height=300px></p>
### Sometimes DoH or DoT shows no?
This could just be a fault on 1.1.1.1/help and host cause according to logs, for example DNScrypt with DNS over HTTPS shows it **does receive a query response/PASS** although when showing "no" for DNS over HTTPS.
<details><summary>Query logs<img src="https://raw.githubusercontent.com/Tarikul-Islam-Anik/Animated-Fluent-Emojis/master/Emojis/Hand%20gestures/Eyes.png" alt="Eyes" width="25" height="25" /></summary>
<p>
https://user-images.githubusercontent.com/18756975/197397288-18c7f33b-abb3-4628-b8e3-1ad29623f693.mp4
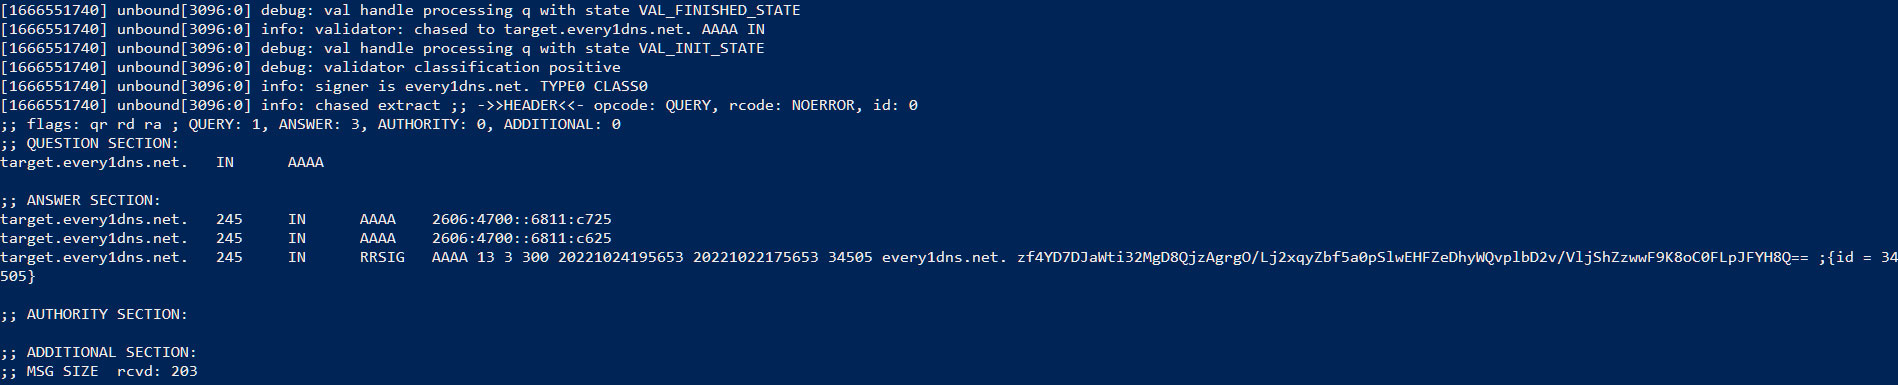
Same goes in Unbound logs when DNS over TLS shows "no"(still gets queried):</br>
A records(IPv4)

AAA records(IPv6)
</p>
</details>
### Use <a href="https://www.google.com/search?q=what+does+tail+command+do+linux&client=firefox-b-d&sxsrf=ALiCzsawidkeBiELxfyKyqucXz1ghKk8tQ%3A1667339937159&ei=oZZhY7GwCZ6WwbkP0vCowAg&ved=0ahUKEwjxhLKl_Y37AhUeSzABHVI4CogQ4dUDCA4&uact=5&oq=what+does+tail+command+do+linux&gs_lcp=Cgxnd3Mtd2l6LXNlcnAQAzIICAAQCBAHEB4yBQgAEIYDMgUIABCGAzIFCAAQhgM6BAgAEEc6BwgjELACECc6BwgAEIAEEA06CggAEAgQBxAeEA86CAgAEAUQBxAeOgYIABAIEB5KBAhBGABKBAhGGABQ5Q5YoDRg6TRoAHAEeACAAZ0BiAHWC5IBBDEuMTKYAQCgAQHIAQjAAQE&sclient=gws-wiz-serp">tail</a> command to monitor logs in realtime:
```bash
## Unbound
## If using unbound from package manager, manually create log file - sudo touch /var/log/unbound.log
## and set permission - sudo chown unbound:unbound /var/log/unbound.log
## Choose verbosity level and set log path in unbound.conf - logfile: /var/log/unbound.log
## Restart unbound - sudo systemctl restart unbound
sudo tail -f /var/log/unbound.log
## DNSCrypt
sudo tail -f /var/log/dnscrypt-proxy/query.log
```
> [!TIP]
> Stable DNS resolving<a href="https://github.com/trinib/AdGuard-WireGuard-Unbound-DNScrypt/wiki/Stable-DNS-resolving(optional)"><b>🔗click here🔗</b></a>
#### Other sites to test security
[browserleaks](https://browserleaks.com/dns) - should show all connected to "Cloudflare"
[dnssec](https://rootcanary.org/test.html) - should say "Yes, your DNS resolver validates DNSSEC signatures"
[dnscheck tools](https://dnscheck.tools/) - inspect your dns resolvers (DNSSEC using ECDSA P-256,DNSSEC using ECDSA P-384,DNSSEC using Ed25519)
**[<img src="https://raw.githubusercontent.com/Tarikul-Islam-Anik/Telegram-Animated-Emojis/main/Symbols/Up%20Button.webp" alt="Up Button" width="25" height="25" /> Return to contents <img src="https://raw.githubusercontent.com/Tarikul-Islam-Anik/Telegram-Animated-Emojis/main/Symbols/Up%20Button.webp" alt="Up Button" width="25" height="25" />](#table-of-contents)**
#
<h1 align="center"><b><i>Install WireGuard</b></i> </h1>
> [!WARNING]
> **Before installing WireGuard**, if you do not have a external/public <a href="https://www.google.com/search?client=firefox-b-d&q=static+IP">static IP</a> it will change dynamically from your internet service provider or from a router reboot. You will need to setup a dynamic DNS service with a hostname to keep automatically up-to-date with a dynamic IP<a href="https://github.com/trinib/AdGuard-WireGuard-Unbound-Cloudflare/wiki/Create-a-DNS-domain-hostname"><b>🔗click here🔗</b></a>. Or else skip this.
> [!IMPORTANT]
> You also need to set up <a href="https://www.google.com/search?q=What+is+port+forwarding+used+for%3F&client=firefox-b-d&sxsrf=APq-WBuwPqGlPJ6N9_l6qpQ3e5sYoUxZAQ%3A1650219365125&ei=ZVlcYo6sB6SGwbkP8tGOwA8&ved=0ahUKEwjO8ryY2pv3AhUkQzABHfKoA_gQ4dUDCA0&uact=5&oq=What+is+port+forwarding+used+for%3F&gs_lcp=Cgdnd3Mtd2l6EAMyBggAEBYQHjoHCAAQRxCwAzoHCAAQsAMQQ0oECEEYAEoECEYYAFDMAVjMAWCBBWgBcAF4AIABbIgBbJIBAzAuMZgBAKABAqABAcgBCsABAQ&sclient=gws-wiz">port forwarding</a> on your router so you can access WireGuard network anywhere like open wifi/hotspots and even from mobile data tethering.
TYPE | VALUE
------------ | -------------
Device | Raspberry Pi's hostname or IP
Protocol | UDP
Port range | 51820-51820
Outgoing port | 51820
Permit Internet access(if have) | yes
Example of my router port settings:
<p align="center">
<img src="https://i.imgur.com/TNK2QMt.jpg" width=650px height=450px></p>
> [!NOTE]
> Other router brands will have a different interface look. Google search it for help. If you cannot connect from a outside network that means your ISP has blocked incoming connections and only allow outgoing, call them and ask nicely to unblock.
#
<img src="https://raw.githubusercontent.com/Tarikul-Islam-Anik/Animated-Fluent-Emojis/master/Emojis/Hand%20gestures/Oncoming%20Fist.png" alt="Oncoming Fist" width="25" height="25" />BIG THANKS<img src="https://raw.githubusercontent.com/Tarikul-Islam-Anik/Animated-Fluent-Emojis/master/Emojis/Hand%20gestures/Oncoming%20Fist.png" alt="Oncoming Fist" width="25" height="25" /> for this installation script from <a href="https://github.com/Nyr/wireguard-install">Nyr</a>. Follow to keep updated.<br>(<a href="https://www.pivpn.io/">PiVPN</a> script can also be used)
Download and run script in terminal:
```bash
wget https://git.io/wireguard -O wireguard-install.sh && sudo bash wireguard-install.sh
```
* The script is going to ask for a Public IPv4/hostname for the VPN. If you have static IP then continue or else type the dynamic DNS hostname that was created from the <a href="https://github.com/trinib/AdGuard-WireGuard-Unbound-Cloudflare/wiki/Create-a-DNS-domain-hostname">instructions</a>. For example:`trinibvpn.freeddns.org`
* For port option `press enter` for default 51820, set client name and for DNS use option 3 (`1.1.1.1`) for now.
<p align="center">
<img src="https://i.imgur.com/WUNZIK4.jpg"></p>
* Wait until the installation is finished and QR code to show, <b>don't close</b>. But if do, to `regenerate qrcode`, enter in terminal but replacing just the name `yourclientname.conf` file to yours:
```bash
sudo cp /root/yourclientname.conf /home/pi && sudo qrencode -t ansiutf8 < yourclientname.conf
```
> [!NOTE]
> For each device, you will need to add a new client/user<i>(cannot use 1 client for multiple devices at the same time)</i>. To add, re-run the script and create another user with different client name.
### Connecting VPN To Android/iOS Phone
Install the WireGuard app from Google Play or App Store:
WireGuard (Google Play): https://play.google.com/store/apps/details?id=com.wireguard.android
WireGuard (App Store): https://apps.apple.com/us/app/wireguard/id1441195209
Scan the QR code shown in the terminal with WireGuard app, select the `+ button` and use the option `Scan from QR code` to install configuration.
- Enable **kernel module backend** in settings
<p align="left">
<img src="https://i.imgur.com/R4qbiOQ.jpg" width=250px height=350px></p>
### Connecting VPN to Windows
WireGuard for windows: https://download.wireguard.com/windows-client/wireguard-installer.exe
* Create a `new text document` with any name on PC to copy over the text from WireGuard client configuration file.
* To see text in client config file, type in terminal:
```bash
sudo cat /root/yourclientname.conf
```
* Highlight all the text, copy and paste it in the txt file on PC and save. Then rename the extension from `txt` to `conf`. Now you have config file for that specific WireGuard client/user.
* Import the config file to WireGuard (import from file option), save and connect.
## Configure WireGuard with adblocking & DNS security
> [!NOTE]
> I think it might not make much of a difference to use DoT/DoH/oDoH with WireGuard security protocols. Though from my experience and in forums, it does not seem to cause any issues using them together. Mainly this is to achieve adblocking with a VPN on public networks.
* In WireGuard app, select your tunnel name and select edit (pencil on top right)
* Under DNS servers enter `Pi's IP`(IPv4 & IPv6) and save
<p align="center">
<img src="https://i.imgur.com/UC0vWfE.jpg" width=450px height=500px></p>
### _Install OpenVPN as an alternative<a href="https://github.com/trinib/AdGuard-WireGuard-Unbound-Cloudflare/wiki/Install-OpenVPN"><b>🔗click here🔗</b></a>_
#
### Limit traffic
Self-hosted VPNs will lose a fair percentage of internet speed from the process of tunneling through Linux system, to router, to devices. You need send traffic through your local network only for better speeds<a href="https://github.com/trinib/AdGuard-WireGuard-Unbound-Cloudflare/wiki/Limit-traffic-on-VPN"><b>🔗click here🔗</b></a>.
#
### Disable all IPv6
#### Disable IPv6 if you don't have it or don't want it<a href="https://github.com/trinib/AdGuard-WireGuard-Unbound-Cloudflare/wiki/Disable-all-IPv6"><b>🔗click here🔗</b></a>. In result if you have weak internet, disabling IPv6 can speed up dns records and request but have less security.
#
## Test VPN
How to know if WireGuard VPN is really working?
For **windows** download Wireshark: https://www.wireshark.org/#download
Once downloaded, use the application to inspect data packets where the protocol is set to the one used by WireGuard VPN. When a packet traffic is `encrypted`, it can be read like this for example:
<p align="center">
<img src="https://i.imgur.com/Tn4M47R.jpg"></p>
For **android** use PCAPdroid: https://play.google.com/store/apps/details?id=com.emanuelef.remote_capture&hl=en&gl=US
You should see all connections `closed` and status showing all `DNS port 53` and not any TLS port 443 connections from all apps. (open and use apps for PCAPdroid to scan)
**[<img src="https://raw.githubusercontent.com/Tarikul-Islam-Anik/Telegram-Animated-Emojis/main/Symbols/Up%20Button.webp" alt="Up Button" width="25" height="25" /> Return to contents <img src="https://raw.githubusercontent.com/Tarikul-Islam-Anik/Telegram-Animated-Emojis/main/Symbols/Up%20Button.webp" alt="Up Button" width="25" height="25" />](#table-of-contents)**
***
<p align="center">
<b><i>✨ 𝘈𝘕𝘠 𝘐𝘚𝘚𝘜𝘌𝘚, 𝘍𝘐𝘟𝘌𝘚 𝘖𝘙 𝘛𝘐𝘗𝘚 𝘛𝘖 𝘔𝘈𝘒𝘌 𝘛𝘏𝘌𝘚𝘌 𝘗𝘙𝘖𝘑𝘌𝘊𝘛𝘚 𝘉𝘌𝘛𝘛𝘌𝘙 𝘗𝘓𝘌𝘈𝘚𝘌 𝘊𝘖𝘕𝘛𝘙𝘐𝘉𝘜𝘛𝘌 ✨</i></b>
<p align="center">
<img src="https://user-images.githubusercontent.com/73097560/115834477-dbab4500-a447-11eb-908a-139a6edaec5c.gif"
<br>
<br>
<br>
<p align="center">
<img src="https://i.imgur.com/Q07E7SW.gif" width=500px height=30px>
<p align="center">
<a href="https://github.com/trinib/AdGuard-WireGuard-Unbound-Cloudflare/stargazers"><img src="http://reporoster.com/stars/dark/trinib/AdGuard-WireGuard-Unbound-DNScrypt"></a>
<p align="center">
<img src="https://user-images.githubusercontent.com/73097560/115834477-dbab4500-a447-11eb-908a-139a6edaec5c.gif"></p>
#
## Extras
<a href="https://github.com/trinib/AdGuard-WireGuard-Unbound-DNScrypt/wiki/Install-NextDNS">NextDNS Client</a>
<a href="https://github.com/trinib/AdGuard-WireGuard-Unbound-DNScrypt/wiki/Network-CLI-Tools">Network CLI Tools</a>
<a href="https://github.com/trinib/AdGuard-WireGuard-Unbound-DNScrypt/wiki/Secure-Raspberry-Pi(Linux)">Secure Raspberry Pi</a>
<a href="https://github.com/trinib/AdGuard-WireGuard-Unbound-DNScrypt/wiki/Auto-Update-Raspberry-Pi">Auto Update Raspberry Pi</a>
<a href="https://github.com/trinib/AdGuard-WireGuard-Unbound-DNScrypt/wiki/AdGuard-Home-Dark-Theme">AdGuard Home Dark Theme</a>
<a href="https://github.com/trinib/AdGuard-WireGuard-Unbound-DNScrypt/wiki/Improve-SD-Card%E2%80%99s-lifespan">Improve SD Card’s lifespan</a>
<a href="https://github.com/trinib/Linux-Bash-Commands">Linux Bash commands</a>
#
## Repository Resources
https://github.com/AdguardTeam/AdGuardHome/wiki
https://docs.pi-hole.net/
https://developers.cloudflare.com/
https://unbound.docs.nlnetlabs.nl/en/latest/
https://knot-resolver.readthedocs.io/en/stable/#
https://dnsprivacy.org/dns_privacy_clients/
https://github.com/DNSCrypt/dnscrypt-proxy/wiki
https://github.com/Nyr/wireguard-install
https://github.com/T145/black-mirror